ModbusTCP Smart and Node-RED / MQTT: Control and monitoring for DaheimLader EV chargers
- DaheimLaden

- Mar 4
- 4 min read
Node-RED is a low-code platform for developing event-driven applications.
It is particularly well suited for capturing, processing, and visualizing real-time data.
In many smart home systems, Node-RED is already integrated or can be installed with just a few clicks. As a standardized interface between Node-RED and other systems, an MQTT broker has proven to be effective.
For visualization and analysis of MQTT data, we recommend MQTT Explorer by Thomas Nordquist (https://mqtt-explorer.com/).
Both components — Node-RED and the MQTT broker — can be accessed via a web interface after installation.

Installing the Modbus nodes
First, install the so-called (program) palette for the Modbus nodes (click as shown by the red arrow) or press Alt + Shift + P, go to Install, and enter “modbus” in the Search field.
Please make sure to select exactly this installation package; the version number may vary.

Next, select the Import of the flow data using the button (red arrow) or press Ctrl + I, and insert the program code completely into the pink field.
To do this, open the downloaded file WallboxModbflow.json using Windows Editor or Notepad++. Press Ctrl + A to select the entire text and copy it using Ctrl + C.
Then switch to the Node-RED program window and paste the text into the pink field using Ctrl + V. By clicking “Import”, the program code will be loaded and displayed as a flow with all nodes.

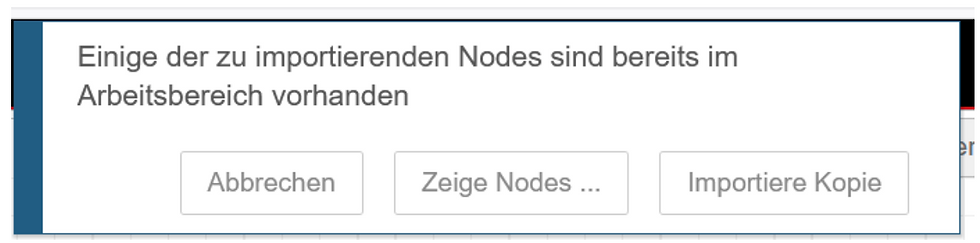
If the following window appears during the import process, please select the “Import copy” button.
The new flow will now appear in the editor and is marked with a blue dot to indicate that it has been modified.


Configuring the IP addresses
First, the required IP addresses must now be entered.
Configuring the Modbus server
Select the Modbus Getter by double-clicking it and open the server configuration.


The settings for Port, Type, and ID should already be configured through the import.
The important parameter here is the IP address of the EV charger.
Important: The IP address must not change. It is recommended to use a static IP address or a DHCP reservation in the router. Otherwise, the IP address of the EV charger may change after a restart or another router-related event.
MQTT broker settings
Now we configure the IP address of the MQTT server. To do this, double-click one of the purple output nodes and select the server configuration.

Enter the IP address of the MQTT broker here.

If a username and password were set for the MQTT broker during installation, please enter them under the “Security” tab and then close the window.
Activating the flow
Once these steps are completed, simply press the “Deploy” button and the connections will be established. After about 20 seconds, a message with the following content should appear in the debug window.

array[115] indicates that all 115 registers (from register 0 to register 114) of the EV charger have been read.
The values are now made available via MQTT and can be further processed in any smart home system.

Which Modbus registers are used?
When importing the data, I deliberately omitted some registers. The registers containing various timestamps are missing, because in the smart home system the values are captured whenever the displayed value changes and are then stored accordingly in a database.
The evaluation includes the following contents from top to bottom:
[1]–[8] are all values that are included in the DaheimLaden app. You could even omit the two registers for charging current min and max, since both are fixed values.
[9]–[18] are registers whose values are only available via Modbus communication and can be used for various evaluations. Particularly interesting here is the value for the power of the current charging session—in the app you only see this after the current session has ended.
[19]–[23] are the registers to which values are also written.
Please note that the setpoint for the active charging current [8] and [21] are not identical. This means you can set one value in the app and transmit a different value via Modbus.
These values are only valid when charging is carried out in the respective mode.
In the current flow, setpoint values and the start/stop function of the EV charger can only be executed manually. This is intentional, since all other actions depend on the smart home application being used and could be confusing for first-time users due to possible error messages.
To check whether the EV charger is online or offline, the return value was evaluated. An HTTP request is sent, and normally no value is returned by the EV charger. However, if it is online, you receive an ECONNREFUSED, and if it times out because it is unreachable, you get an EHOSTUNREACH. These messages—as well as the messages from [3]—can, for example, be output via an integration with a Telegram bot.

Outlook
Here is a brief outlook on integration with openHAB.

and a screenshot showing the analysis of the data using Grafana:


